Since the Silverlight end of life in October 2021, users have had to find a way to combat vulnerability in order to keep using it safely. Since Microsoft ended support for Silverlight, Browsium Ion has made it possible to use the application framework securely and without issue.
Ion 3.6 or later
Internet Explorer
Windows 10
This article will guide users through setting up a profile to load a given web site using Silverlight. We will be adding a couple of registry entries into this profile to ensure that the Silverlight ActiveX control will remain enabled for specific user defined applications after Microsoft ends support for Silverlight on October 12, 2021. Since there will be no further feature or security updates to Silverlight after that date you will want to limit your use of Silverlight to specific applications by using an Ion profile to allow the Silverlight ActiveX control to run where needed. You can then otherwise disable the ActiveX control elsewhere in your environment and not have to worry about losing functionality.
You will want to have the Browsium Client and the Ion Configuration Manager installed on a machine where Silverlight is present. You will also need to create a standard Ion profile for our registry modifications. For testing purposes, you can add a rule to match https://silverlightversion.com.
For our first custom registry we will want to create a new custom registry entry in the Custom Registry Manager in the profile we created above. You will want to populate it with the values indicated below. This allows Silverlight to run if Microsoft places Silverlight on the VersionCheck list, a method that may be used to disable Silverlight.

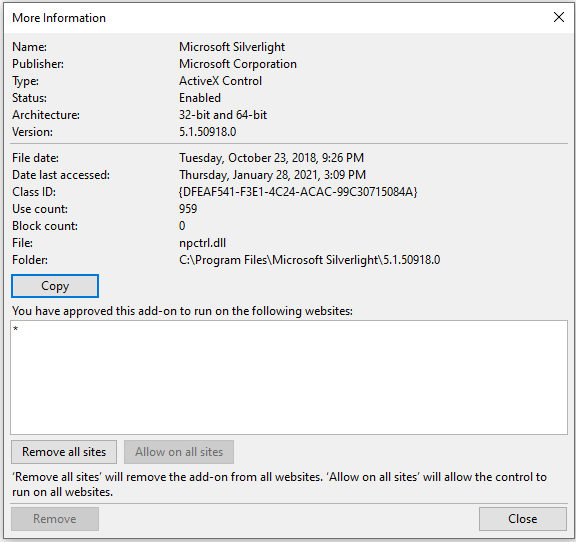
1. Identify the CLASS ID (CLSID) for the control you need to run. You can get the CLSID from the manufacturer. Sometimes you can also find the CLSID using the control’s friendly name. Go through the CLSID keys at HKEY_CLASSES_ROOT\CLSID until you find a ProgID key with a Default string that matches the friendly name. IE8 & IE9’s “Manage Add-ons” will show this information for controls it can load (ActiveX controls “killed” by killbits won’t show up in this list). To view the CLSID for an add-on inside IE8 or IE9, open “Manage Add-ons” from the browser, select the control in question and choose “More information” from the details. This window shows advanced information for Ion’s own Client add-on control, including its CLSID (shown near the middle of the window):
The ActiveX “kill bit” is represented in the registry by the DWORD value 0x00000400. The bit is set in the Compatibility Flags key at HKEY_LOCAL_MACHINE\SOFTWARE\Microsoft\Internet Explorer\ActiveX Compatibility\<CLSID of the ActiveX control>. You’ll need a valid flag to replace the kill-bit value. You can find a list of flags in Microsoft’s documentation. For this example and in most cases, it is safe to use the value “0x0080000” (COMPAT_SAFEFOR_LOADING)
2. Open Ion Configuration Manager. Open your Ion Project and select the Custom Registry Manager for the Ion profile you wish to change
3. Click “Add Custom Registry Entry…” in the Actions pane on the right
4. Change the Hive dropdown to “Local Machine” (short for HKEY_LOCAL_MACHINE)
5. In the Key field, type “SOFTWARE\Microsoft\Internet Explorer\ActiveX Compatibility\<CLSID of the ActiveX control>”, substituting the control’s CLSID and removing the quotation marks. Note that the CLSID includes the curly brackes ({}), so include those in the full path
7. Enter “Compatibility Flags” (no quotation marks) in the “Value Name” field
8. Change the Type dropdown to DWord
9. Type “0x0080000” (no quotation marks) in the “Value Data” field. Your Ion Configuration Manager window should look something like this (note that your CLSID will differ from the screenshot shown below):

10. Click “OK” to save this setting. You will now see both of your custom entries in the Manager, as shown here:

11. To test, click “Save Local Settings” from the “File” menu. This will allow your ActiveX control to work for applications you designate for this profile, but remain disabled for other websites.
12. Click “Start Test Configuration” from the File menu to deploy this project to your PC. You should see Silverlight version information when visiting https://silverlightversion.com.
Posted in: Ion Knowledge Base,
